

Every few months my smart home addiction kicks in and I tend to buy another little sensor, light, widget, etc. This time around I decided I wanted to finally get into Matter + Thread. Going into this all I knew was that Matter and Thread were very much hyped IoT communication standards that were supposed to harmonize a lot of splintering of the various ecosystems over the past few years, and I finally started seeing more and more manufacturers launching products that offered support, so my assumption was that many of the early kinks had most likely been worked out already.. 😂
In this post I'll share what I've learned setting up a thread network at home via Homeassistant and hopefully help you avoid making all the same mistakes I did.
Grundwissen
Let's begin by defining some terms, going over the basics, and setting the stage for the rest of the post. So first off - what even is Matter, what is Thread and how do they relate?!
Matter
Matter is a home automation standard launched in 2019 by a consortium of companies including Apple, Google, Amazon, and the Zigbee Alliance. It's designed to be a universal standard API for smart home devices, allowing them to work together regardless of the manufacturer. Matter is a layer 7 protocol, meaning it is transport independent and only defines things like device types, possible actions, etc. I like to think of it as a standardized API that all smarthome devices can implement to ensure other devices can talk to them. For example, as of the time of writing we're currently on Matter v1.4 which added support for various electrical devices like batteries, solar systems, heat pumps, and more.
What you should know here is that like every piece of software, not every implementation / manufacturer supports the latest and greatest version of the specification and while some release updates quickly, others are much slower to update.
Thread
Thread, unlike Matter, is a physical communication protocol. It is based on the same IEEE 802.15.4 standard as Zigbee and 6LoWPAN and therefore uses the same 2.4 GHz spectrum. It's designed to be a low-power, wireless mesh network protocol that runs exclusively over IPv6. If you're familiar with the home automation space you can think of it as a replacement for Zigbee or Z-Wave, i.e. another wireless network that runs in parallel to your pre-existing WiFi network. There's not a whole lot more to say here other than it is specifically designed for low-power (i.e. battery powered) devices, and requires a local IPv6 network (no external IPv6 connectivity required, so those of you on ancient ISPs like me can still use it). Something interesting to note is that Google open sourced (BSD Licensed) the canonical Thread Border Router implementation, OpenThread. A Thread Border Router can be thought of as the coordinator of a Thread network. The Google implementation powers the Homeassistant add-on we'll be using later. Espressif also ported it over to run on ESP32's if you're interested in that.
Thread runs exclusively over IPv6. So if your home network can't at least internally route IPv6 traffic, then you'll need to upgrade that equipment first.
NoteYou do not need a public IPv6 address from your ISP to run Thread. Simply enabling support on your local router is sufficient.
Thread, being designed for consumer smart home use, also does not support more complex network topologies like VLANs. This means that if you're network at home is segregated via VLANs and Subnets, you'll need to make sure that your Thread devices are all on the same subnet as your Thread Border Router. Additional experimentation to work around this can be found below.
Jumping the gun
Okay so far we've established that Matter is the API, so to speak, and Thread is the physical link layer protocol over which Matter often (but not exclusively!) runs.
My very first, uninformed, attempt to be an early adopter here resulted in me buying the Ikea Drigeria hub which I'd read just added Matter support in a recent firmware update. I was under the impression that I could use this for both the Ikea smart home devices, as well as any other Matter / Thread devices. Unfortunately Ikea's implementation is using Zigbee as underlying radio, but does use Matter as the API layer.
NoteI've actually been really happy with the Ikea smart-home line of products. They're super easy to setup, reliable, and plug into Homeassistant very well via the Drigeria integration.
Hardware
That brings us to the last important piece of prerequisite equipment - the Thread Border Router (TBR). A TBR is the device that bridges your physically separate Thread network to the rest of your home network. It is responsible for routing traffic between the two networks and is the device that your Thread devices will connect to in order to communicate with the rest of your network. You can think of it as a "hub" like you might already have for many other manufacturers' smart home devices. However, this one is not manufacturer specific and will act as a hub for any and all Thread devices, like a Zigbee coordinator.
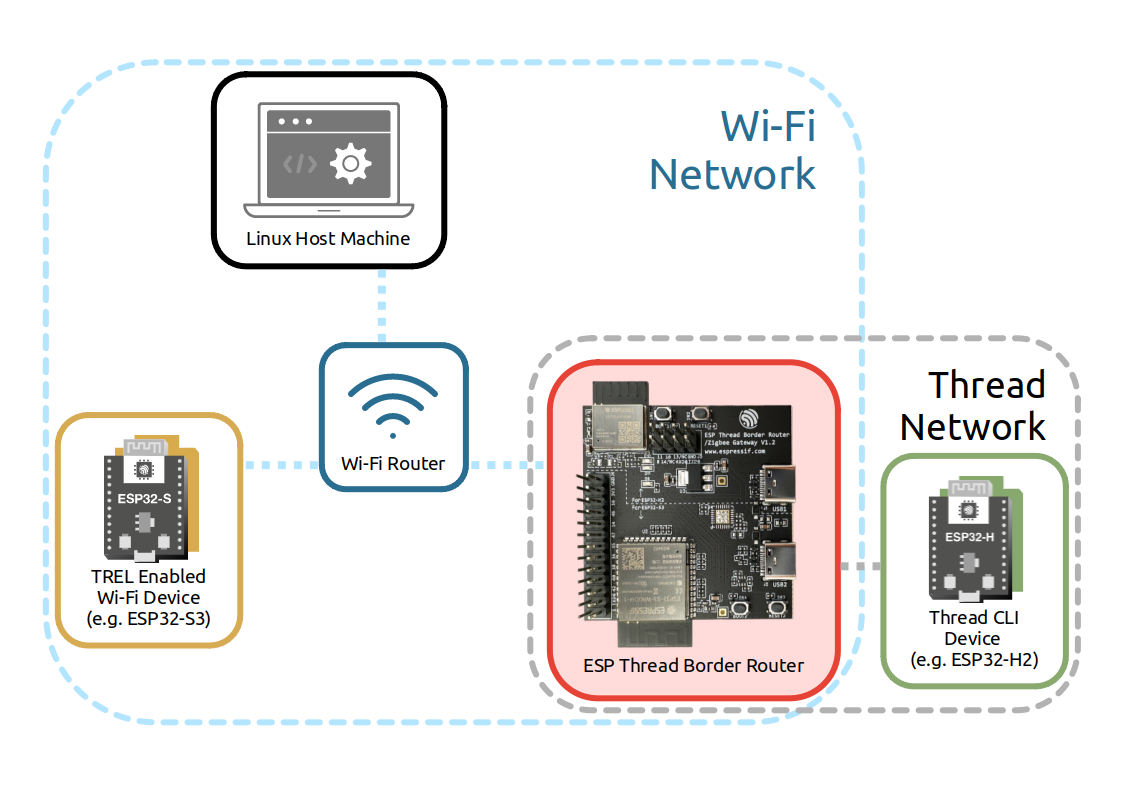
A Border Router can come in many shapes and sizes. Initially I attempted to use the Espressif development board (https://github.com/espressif/esp-thread-br) which combines both an ESP32 C3 (for WiFi + Bluetooth) and an ESP32 H2 (for 802.15.4 Thread) on a single board. Unfortunately I was unable to get this to work, so I ended up buying the Nabu Casa ZBT-1 USB Dongle (previously known as the Homeassistant Skyconnect) as that had many more successful users using it on the Homeassistant forums and elsewhere on the web. Looking back, it was probably just me misconfiguring my local IPv6 setup, but that's neither here nor there haha.
In addition to the ZBT-1 Nabu Casa adapter and the Espressif dev board, Thread Border Router functionality can often be found in smart home hub-type devices such as the Nest Home (Google Home Max), Amazon Echo's, Apple HomePods, etc. These will all provide the 802.15.4 network and bridge it into your pre-existing local IPv6 network. If you have one of these devices, you won't need to buy any additional hardware.
Since my Homeassistant instance is running in a VM on my Proxmox box, I ensured there are a few Linux kernel networking settings set as well. First, in the Proxmox instance's firewall settings, even if the firewall is disabled, ensure you've enabled the accept_ra option. Then, in the Homeassistant VM I set the following sysctl parameters:
net.ipv4.ip_forward = 1
net.ipv6.conf.all.forwarding = 1
net.ipv6.conf.all.accept_ra = 2
net.ipv6.conf.all.accept_ra_rt_info_max_plen = 64
net.ipv6.conf.default.accept_ra = 2
net.ipv6.conf.default.accept_ra_rt_info_max_plen = 64
net.ipv6.conf.ens19.accept_ra = 2
net.ipv6.conf.ens19.accept_ra_rt_info_max_plen = 64
net.ipv6.conf.hassio.accept_ra = 2
net.ipv6.conf.hassio.accept_ra_rt_info_max_plen = 64
The most important parts here are the IPv6 forwarding and the accept_ra on the VM's interface. We'll be forwarding packets back and forth between our local IPv6 network (i.e. from the Android device used to provision the Thread/Matter device) and the Thread network on the wpan0 interface created by the OTBR Homeassistant add-on. In my case specifically that looks like fd66::1/64 < - > fd13:2b1b:5107:3bff:0:ff:fe00:fc11/64.
Finally, I shared the Homeassistant ZBT-1 USB device on from the host Proxmox box to the Homeassistant VM. It was immediately picked up by the Debian (HAOS) VM and available as a new device in my Homeassistant dashboard. I set it up using the Thread-only firmware. When initialising the ZBT-1 you can select Zigbee-only, Thread-only, and Multiprotocol. Nabu Casa nowadays recommends against using the multiprotocol firmware.
Just like in Zigbee, you can have multiple coordinators or Border Routers in your system. These act to forward on packets and extend the range of your network. To get up and running, only 1 is required though. Since we have this setup now, let's finally try to add some devices to our network!
Provisioning
Provisioning a Matter + Thread device is designed to be relatively simple compared to previous smart home products and ecosystems. You won't need to download a new app from another manufacturer or buy another Hub for each ecosystem. Once you've got at least 1 Border Router up and running, all Matter + Thread devices should be able to be provisioned via that router and communicate with your network via that same border router as well.
As previously mentioned, I decided to use that ZBT-1 USB dongle which allows my Homeassistant instance itself to be the Border Router. Specifically, I needed to install the Open Thread Border Router addon and ensure my ZBT-1 USB Dongle is available to the Homeassistant VM. For more information on using your Homeassistant instance as a border router, leveraging the ZBT-1 as the radio, take a look at the documentation here.
Once installed, provisioning new devices works by using your Android / iOS device with the Homeassistant app installed to scan a QR Code provided with every Matter + Thread device. In the Homeassistant app under "Devices" click the "+" floating action button and select "Add Matter Device", from there select "New Device". This will open the camera app with which you can scan the QR code. This QR code contains a string like MT:Y.K9042C00KA0648G00. The MT prefix indicates that the following will be a Matter code, and the remainder is a base 38 encoded string which includes things like Matter version number required to talk to the device, some configuration values like manufacturer / device ID, discovery capabilities, and a PIN code.
Once scanned, your phone will attempt to connect to the device via the discovery capabilities the QR code says the device supports. I've only ever encountered Bluetooth as the discovery capability, so the smartphone then uses Bluetooth Low Energy (BLE) to initiate the pairing process with the target Matter + Thread device. Once it's been joined to your physical Thread network, Homeassistant will begin to look for the target device on the network. OpenThread Border Router will publish a service under the mDNS prefix _meshcop._udp as defined in the Thread specification. This helps devices find your Border Router. Once found, Homeassistant creates the device entries which can then be found under the "Matter" integration on your Homeassistant's "Integrations/Devices" page. This is where I was stuck for a long, long time :lolsob:, more info below.
NoteIt is important to note that not every feature of your chosen device may be available to you if you decide to use it via Matter + Thread. For example, the Matter specification defines which functionalities your device can expose. So it might not support advanced features like setting scenes on your LED strip or measuring power on your smart power sockets. Something that might have been possible when the same device was used over Wifi and the manufacturer's own app might not be now, since the manufacturer is now not writing and controlling the whole API.
This all boils down to which APIs are supported in the current version of the Matter specification. Both the device and Homeassistant will have to support the version of Matter with the features you're looking to use. Fortunately, Homeassistant is usually well ahead of any other implementor of Matter, so much so that manufacturers often use Homeassistant in their own testing and development. I've found that pretty much all basic functionality is supported by now, however, as previously mentioned sometimes things such as LED scenes aren't supported, and power measurement APIs were only added in the most recent Matter spec.
Bumps and Bruises
I really struggled provisioning my first few Matter + Thread devices, so let's go through some of the more common pitfalls and hopefully help you avoid them too. My personal setup includes the following relevant devices and software:
- Virtualised OPNSense router and firewall running as a Proxmox VM
- Homeassistant VM running on the same Proxmox host
- Unifi U6 Lite access point 3a. Two separate SSIDs / Subnets for IoT devices and the remainder of my WLAN clients
- Homeassistant acting as the Border Router via OpenThread and the ZBT-1 USB dongle
So I've mentioned a few of the things you have to watch out for above already, but let's summarize them again here and then we'll go into detail on each one.
- Ensure your Thread Border Router and Homeassistant device are on the same subnet.
- Ensure your local network supports IPv6, especially SLAAC, and allows ICMPv6 multicast messages to travel freely.
- Ensure you have an Android / iOS device that can scan QR Codes and has Bluetooth to do the initial Matter device provisioning.
- Ensure multicast DNS / UDP Broadcast messages aren't blocked or otherwise filtered on your network.
Networking Prerequisites
Thread and Matter are designed to be used by consumers in their homes. Therefore, none of these things have been designed with subnetting, VLANs, etc. in mind. My network initially was setup with Subnet A for servers and VMs such as Homeassistant. Then I have 2 SSIDs on my access point that each also use their own VLAN + subnet. Unfortunately, this will not work.
I tried to force this setup to work via firewall rules, including reflecting mDNS multicast packets into the relevant subnets, but in the end adding devices always failed with an error along the lines of "Homeassistant can't communicate with your device" from the Homeassistant Android app. What I ended up doing to work around this issue, was to give my Homeassistant VM another interface on the "internal devices" subnet. This means that both Homeassistant (and by extension my Border Router) is now in the same subnet as my Android device (connected via Wifi) which is doing the initial Matter + Thread device provisioning in the Homeassistant app.
Android doesn't support DHCPv6 yet, so you'll need to ensure that your network supports SLAAC (Stateless Address Autoconfiguration) for IPv6. If you're using a firewall like OPNSense, you'll also need to ensure that the firewall rules allow ICMPv6 packets to pass through. This is necessary for SLAAC, among other things like neighbor and router advertisements, to work properly. If you're not very familiar with IPv6, like I was going into this, SLAAC is an alternative to DHCP. In the IPv6 world, there is DHCP like you're used to in IPv4, however, SLAAC is a common alternative that flips the DHCP system on its head. Your router will not distribute an address to the client, but the client will assign itself an address under a shared prefix.
OPNSense IPv6 Details
If you're also using OPNSense as your firewall, ensure the following:
- Each interface should have IPv6 enabled and a static address assigned to them.
- Then you'll notice that a new "Router Advertisement" service appears in your sidebar
- In the Router Advertisement section, ensure each interface is set to "Unmanaged", which enables SLAAC-only (no DHCPv6) and that "Advertise Default Gateway" is enabled.
- I also noticed that under "System" -> "Gateways" my relevant interfaces IPv6 Gateways didnt have any IP added. So I ensured they had the IP of the interface set as the gateway IP that will be shared to client devices.
- I also noticed that when using Tailscale (the official VPN add-on in OPNSense under VPN -> Tailscale), it would add itself and its IPv6 Subnet as the default route for IPv6. I'm not sure how much of an issue this is, but I always disabled Tailscale when trying to provision and add a new Thread/Matter device.
- In regard to firewall rules, I have the following enabled on the AP interface / network:
- Allow IPv4/v6, any direction, any source / destination, ports 5540-5541 - These are the Matter autodiscovery ports
- Allow IPv4 UDP, IN, from local interface nets, to
224.0.0.251/32port5353- This is the IPv4 mDNS - Allow IPv6 UDP, IN, from local interface nets, to
ff02::fbport5353- For IPv6 mDNS - Allow IPv6 TCP/UDP, IN, from any, to
239.255.255.250/32port1900- For IPv4 SSDP (probably not relevant to Thread/Matter, but useful for IoT either way)
NoteIf, like me, you're only familiar with ICMP as the protocol used by
pingrequests (i.e. an ICMPecho), then you'll be pleased to learn that in IPv6 ICMP messages are used for much more then just ping. There are many predefined ICMPv6 message types and they are commonly used for important network management functoins such as SLAAC, but also neighbor discovery, router advertisements, etc.
Wifi
On the Ubiquiti wifi side, I played around with all sorts of settings, but what ended up working is to simply enable the "Multicast Enhancement" setting in the advanced settings of the relevant SSID as well as the "IoT Auto-Discovery" setting under the main "Network" settings page. These settings are designed to help with multicast traffic, which is used by mDNS and other discovery protocols. It essentially allows multicast packets to be sent to all clients on the network. Do not enable the "Multicast Filtering" option.
So, are we there yet?
Many of the things mentioned in this post hopefully shouldn't be required knowledge for every single person trying to setup a Thread network and use new Thread + Matter smart home devices. But, if you're like me, and run into all sorts of stumbling blocks, I really hope this post can help shine some light on potential issues and help you debug them!
After struggling with my setup for a few days, I'm still a bit unsure how to feel about Thread + Matter as technologies. Are they ready for prime time? If you just read through this whole post, then you'll probably agree with my initial gut feeling of "no way!". However, the more I think about it, the more I think most of the issues I ran into were due to my "unusual" network configuration and my inability to stop fiddling with settings 😂. I think (hope) that an average consumer that has a Nest Max or Apple Homepod at home and their ISP's router would have success much more quickly than I had. If that's not the case I'd love to hear your story though.
With all that being said, I think I'd hesitantly recommend folks dip their toes into Matter + Thread. If and only if they're also not afraid of being an early adopter and maybe paying that tax with some debugging and tweaking of their network. After all, it was a great learning experience for me and I definitely came out the other end being more knowledgable about networking generally, and IPv6 specifically.
Notes
Some other notes that I didn't know where to put here, but that I found helpful while debugging and troubleshooting.
-
Homeassistant has a great Matter documentation page that includes some troubleshooting tips, common problems and solutions.
-
The Border Router will advertise itself under the
_meshcop._udpmDNS prefix, as previously mentioned, but the devices themselves will also advertise their hostnames under the_matter._udpmDNS prefix. This can be helpful to see if your device is advertising itself properly and if it's reachable from your Homeassistant instance. There is a useful Android app to browser mDNS services on your local network called Service Browser. An iOS alternative I haven't personally tried is DNS-SD Browser. -
On a computer, there are the
avahi-*tools, such asavahi-browse-domainsto browse all available mDNS hosts, as well asavahi-resolveto attempt resolving specific hostnames. Both were helpful in debugging. -
Homeassistant will run its own mDNS daemon, so I disabled the
avahi-daemonsystemd service on the host to avoid interference there and disabled mDNS in thesystemd-resolvedconfig as well. -
There are many IPv6 multicast addresses that you can ping to get a response from certain device types which can be useful for debugging to see if devices can see one another. Some of the useful ones include:
ff02::1			          all nodes
ff02::2			          all routers
ff02::f			          UPNP (Universal Plug and Play) devices
ff02::11			      all homenet nodes
ff02::fb			      multicast DNS IPv6
ff02::101			      network time (NTP)
ff02::1:2			      all DHCP agents
ff02::1:3			      LLMNR (Link-Local Multicast Name Resolution)
ff02:0:0:0:0:1:ff00::/104			      solicited node address
ff02:0:0:0:0:1-2:ff00::/104			      node information query
ff05::1:3			      all DHCP server (site)
ff05::101			      all NTP server (site)
You can ping IPv6 addresses by passing ping the -6 flag. However, these multicast addresses also often necessitate you explicitly defining which interface you want to send them out of. This can be done by adding a suffix of % followed by your interface name to the target address. So a full ping command to the all nodes endpoint would look something like this:
ping -6 ff02::1%eth0